Understanding Fixation Techniques and the Role of Vital Stains
In a previous article, the different forms of fixation and types of fixatives were discussed. Following that, many readers expressed interest in learning more about the formulas and staining solutions commonly used in microscopy. To address these questions, a PDF document containing detailed technical information is attached to this article.
1. The Role of Vital Stains
Among all staining techniques, vital stains are particularly significant. These stains can penetrate the cell membrane of living organisms because of their lipophilic nature. Some vital stains bind to specific sites within the cytoplasm, such as mitochondria, allowing the observation of living cells in real time.
They must, however, be used in very low concentrations to avoid interference with cellular processes. When applied in higher amounts, they can damage or destroy cells. Vital stains entering a living cell often cause visible structural changes.
Once a cell is fixed, its membrane permeability increases, making it easier for various agents to enter or exit. Certain fixatives can cause rapid loss of structural components, leading to irreversible alterations during the fixation process.
2. Effects of Different Fixatives on Cell Structure
The chemical composition of a fixative determines its effect on tissue structure:
Alcohol-based fixatives often lead to visible shrinkage and deformation due to dehydration, resulting in a reduction in overall size by up to 30%.
Fixatives containing heavy metal ions, such as zinc (Zn²⁺) or mercury (Hg²⁺), can coagulate proteins into granular deposits.
Some older fixative formulas contained tannin, arsenic, detergents, or acids, which may cause damage depending on their concentration and exposure time.
Despite these drawbacks, several fixatives remain valuable under specific conditions. For example, some are particularly effective for preserving fatty substances and are commonly used as secondary fixatives for electron microscopy. It is important to note that many of these agents are highly toxic and must be handled only in controlled laboratory environments.
3. Finding the Right Fixative Balance
Successful fixation requires finding a balance between preservation and artifact formation. Fixatives containing aldehydes, such as formaldehyde and glutaraldehyde, are widely used because they maintain structural integrity while minimizing cellular distortion.
A 4% aqueous formaldehyde solution is considered a nearly universal fixative. When combined with glutaraldehyde, it becomes suitable for both light and electron microscopy. Factors such as pH and osmolarity should always be adjusted carefully to optimize fixation quality.
4. Temperature and Its Effect on Fixation
Temperature significantly influences the fixation process. Higher temperatures accelerate chemical binding and improve fixative penetration but may also increase enzymatic activity, resulting in structural damage.
For sensitive specimens, fixation at low temperatures (0°C–4°C) is preferred. However, for most general applications, fixation at room temperature provides satisfactory results.
5. Microwave-Assisted Fixation
In recent years, microwave-assisted fixation has gained attention as a rapid and efficient method. Household microwave ovens, when used carefully and safely, can serve as effective tools for this process.
Recommended Procedure:
Use glass containers (around 200 ml) filled halfway with the fixative (approximately 100 ml).
Set the microwave to a low power level (about 10–20% of full power).
Run the process for 15 minutes while avoiding overheating.
If the oven has a temperature control, maintain it around 30°C.
A typical procedure involves microwaving the sample for about one hour at low power or temperature-controlled conditions (30°C). Afterward, the specimen can undergo secondary fixation at room temperature for several hours.
⚠️ Safety Note:
If the microwave does not allow low-power or temperature control, do not attempt fixation. Microwaves generate intense heat quickly and can damage both the sample and the equipment. Always follow safety precautions and manufacturer instructions before use.
6. Benefits of Microwave Fixation
Microwave-assisted fixation enhances molecular stabilization and promotes deeper fixative penetration within tissues. The goal is to accelerate fixation reactions without overheating or damaging the sample.
This technique offers a fast, accessible, and efficient alternative to conventional fixation, making it suitable for both educational and small laboratory applications.
Fig. 1. TEM image of a fungal hypha of Agaricus bisporus. Hypha showing portions of two segments (cells) which are incompletely separated by the so-called dolipore septum, visible as an elaborate structure at the centre. A fenestrated sieve membrane and two plugs on both side of the septum are apparent (arrow heads). These plugs are heavily fixed and stained by osmium molecules of the secondary fixative. A round organelle marked with letter L is a vacuole filled with fatty (osmiophilic) susbstace. The scale bar is 2 micrometer.
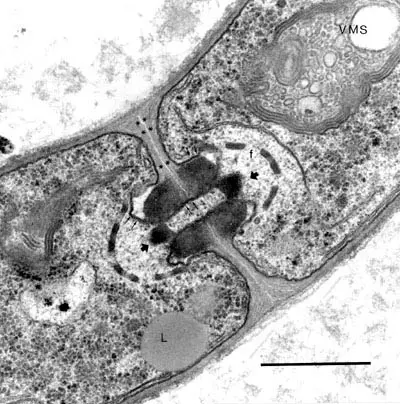
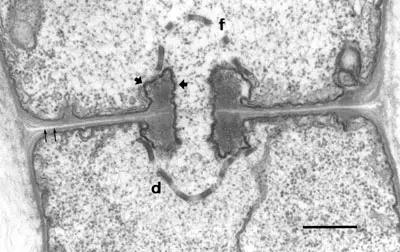
Fig. 2. TEM image of a fungal hypha of Agaricus bisporus. The details of the membranes around the dolipore septum and its fenestrae are shown. The scale bar is 1 micrometer.
Conclusion
Fixation is a crucial step in microscopy, preserving fine cellular and tissue structures for detailed observation. Whether using aldehyde-based solutions or microwave-assisted methods, the effectiveness of fixation depends on the composition of the fixative, temperature control, and exposure time.
For more detailed formulas and practical guidelines, refer to the attached PDF document, which outlines recommended fixatives for both light and electron microscopy.